Page Table of Contents
Reviews and Awards
Are you planning to remove the Blizzard Entertainment platform and its games like World of Warcraft, Call of Duty, and Overwatch? Or, you plan to but can't uninstall Battle.net because of unknown reasons? If you need a way to completely uninstall Battle.net from your PC, this guide from EaseUS offers a comprehensive guide for the automatic and manual uninstallation of Battle.net.

Read on and learn how to uninstall Battle.net and remove its leftover files from your Windows computer with ease.
See also:
What to Do Before Uninstalling Battle.net
Before uninstalling Battle.net, it's crucial to uninstall Blizzard games, as it ensures all relevant files are adequately removed. Here's how to do it for one of your games:
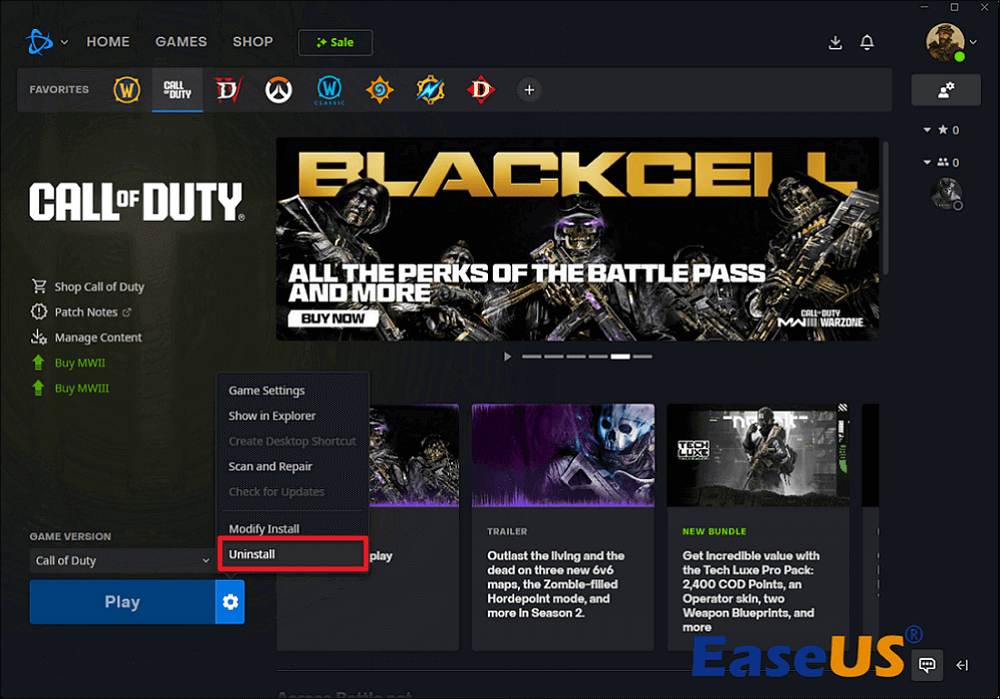
Step 1. Open the Battle.net desktop app.
Step 2. Locate the game in the library.
Step 3. Click on the gear Icon "⚙️" next to "Play" and choose "Uninstall."
Step 4. Then, go to the game's directory folder and delete remnants.
Step 5. Repeat this process for each Blizzard game you have installed to uninstall all games.
Finally, exit and close any programs related to Battle.net or Blizzard games that might be running in the background. These could include the Blizzard Update Agent, any game clients that might be minimized, or Discord if you have its overlay active while playing Blizzard games.
- Tip
- You can check your system tray or Task Manager for these programs and end their processes if necessary.
How to Uninstall Battle.net from Your PC
Whether you're trying to solve Your Hard Drive Is Full on Battle.net, troubleshoot gaming issues, or transition to different gaming platforms, this guide has you covered.
#1. Uninstall Battle.net Automatically
To skip the process of manually locating the leftover files and delete them, you need a powerful program uninstaller. As one of the best application uninstaller tools, EaseUS Todo PCTrans Free is able to uninstall a program in a few seconds and has the ability to remove all relevant files and configurations during the uninstallation.
This tool simplifies the process, allowing you to remove Battle.net and relevant user data, saved files, caches, and logs from your PC with several simple clicks. Follow the steps below to start:
Step 1. Launch EaseUS Todo PCTrans, click "More Tools". Choose App Management, Click "Start" to securely uninstall your apps and repair your damaged apps.

Step 2. All of apps installed on your PC, choose the selected one you want to uninstall or repair. (If your uninstall process fails, you can click the small triangle icon and select "Delete".)

Step 3. Click "Uninstall". (If you want to repair apps, click the icon right behind "Uninstall" and choose "Repair".)

Moreover, if you plan to upgrade your device, this tool offers additional features for moving Blizzard games to another drive or PC, making it an all-in-one solution.
#2. Manually Remove Battle.net and All Leftover Files
While automatic uninstallation is the simpler route, some users prefer the manual approach. However, this method could be time-consuming for some users. Proceed with caution, especially if you're not comfortable navigating system directories.
Part 1. Uninstall Battle.net
Follow the steps to uninstall Battle.net manually:
Step 1. Open Settings by pressing the "Windows" + "I" buttons simultaneously.
Step 2. Search for and navigate to Apps & features.
Step 3. Locate Battle.net and click the "Uninstall" option.

Sometimes, the manual uninstallation process may fail to complete. There are certain users who have reported that they can't uninstall Battle.net via Apps & features or Control Panel. If you are in the same situation, consider reverting to Method 1 and using the free application uninstaller tool EaseUS Todo PCTrans Free to perform the task.
Part 2. Remove Remnants of Battle.net and Blizzard Games
This step is optional but recommended if you want to ensure absolutely no trace of Battle.net or Blizzard games' remnants on your system. However, proceed with caution, as deleting the wrong files can affect other programs. It's crucial to only delete files and folders you're confident are related to Battle.net.
Follow the steps:
Step 1. Open the Run dialog box by pressing "Windows key" + "R."
Step 2. Type %programfiles(x86)% and hit "Enter" to open the target location in File Explorer.
Step 3. Delete everything related to Battle.net, Blizzard, and its games like World of Warcraft.
Step 3. Then, do the same for %programdata%, %appdata%, %localappdata%, and %temp%.
Step 4. Finally, type in Battle.net, Blizzard, and the names of Blizzard games in the search box to check if there are still leftover files and folders remaining.
However, there may still be some hidden files and folders on your computer that cannot be accessed or deleted. It won't be a big deal, but if you are a perfectionist, I recommend you download and use the program uninstaller to ensure everything is removed.
See also:
Conclusion
Whether you're taking a break from Blizzard games or planning to quit games permanently, the process of uninstalling Battle.net can be straightforward with the right approach. This comprehensive guide offers detailed steps for both automated and manual uninstallation methods.
For a hassle-free experience, especially if you're considering a fresh installation or device upgrade, the automated method using EaseUS Todo PCTrans Free stands out. This tool not only streamlines the removal of Battle.net but also offers advanced features for transferring games to another drive or a new computer. To ensure a clean and efficient uninstallation of Battle.net along with any remnants, consider using EaseUS Todo PCTrans Free.
Isn't uninstalling Battle.net simple and fast with the assistance of EaseUS Todo PCTrans? Feel free to share this tool with fellow gamers to help them out.
Uninstall Battle.net FAQs
If you still have questions or encounter challenges, explore the following FAQs.
1. How do I completely uninstall Blizzard?
To completely uninstall Blizzard, you must uninstall each game individually through the Battle.net desktop app. For more detailed methods, visit the guide above to understand better.
2. Why can't I uninstall Blizzard games?
Uninstalling Blizzard games may fail due to active background processes, permission issues, or corrupted installation files. Ensure that all relevant programs are closed and that you have administrator access to the PC.
3. Where is Battle.net installed?
Battle.net is typically installed in the default directory on your system. The default installation path for Battle.net on Windows is C:\Program Files (x86)\Battle.net. However, you must check that directory if you set a different location during installation.
About the Author
Roxanne is one of the main contributors to EaseUS and has created over 200 posts that help users solve multiple issues and failures on digital devices like PCs, Mobile phones, tablets, and Macs. She loves to share ideas with people of the same interests.
Oliver is an EaseUS professional writer who dares explore new areas. With a passion for solving tech issues with straightforward guides for common users, Oliver keeps honing his writing craft by developing in-depth solutions for disk and partition management, computer boot-up issues, file transfer, etc.
Reviews and Awards
-
EaseUS Todo PCTrans Free is a useful and and reliable software solution created to serve in computer migration operations, be it from one machine to another or from an earlier version of your OS to a newer one.
Read More -
EaseUS Todo PCTrans is by the folks at EaseUS who make incredible tools that let you manage your backups and recover your dead hard disks. While it is not an official tool, EaseUS has a reputation for being very good with their software and code.
![]() Read More
Read More
-
It offers the ability to move your entire user account from your old computer, meaning everything is quickly migrated. You still get to keep your Windows installation (and the relevant drivers for your new PC), but you also get all your apps, settings, preferences, images, documents and other important data.
Read More
Related Articles
-
[Full Guide] How to Back Up Programs for Windows 11
![author icon]() Tracy King/2025/01/23
Tracy King/2025/01/23 -
Can't Uninstall League of Legends? How to Fix?
![author icon]() Cici/2025/04/01
Cici/2025/04/01 -
How to Move McAfee from one Computer/Drive to Another Without Reinstalling
![author icon]() Cedric/2025/01/23
Cedric/2025/01/23 -
How to Move Users Folder to Another Drive [4 Ways]
![author icon]() Jean/2025/01/23
Jean/2025/01/23