- Video Recovery
- SD Card Recovery
- Recycle Bin Recovery
- Recover Data from USB
- Recover Deleted Emails
- Hard Drive Not Showing Up in Windows
- Recover Unsaved Word Documents
- Recover Deleted Files in Windows 10
- Recover Files from Virus Infected Hard Drive
- Best Free Photo Recovery Software
- Recover Files from Formatted Hard Drive
You may receive an unexpected "Grant File Access" popup when using Microsoft Word on a Mac. This notification invites you to grant Word permission to access the file you're attempting to open, modify, or save. It may be aggravating, particularly if you're amidst critical work.
This article will explain the probable causes of the Grant File Access on Word for Mac problem and provide step-by-step remedies to help you resolve it. Understanding the reasons and using the solutions provided here will allow you to work on your Word projects without constant interruptions. If you are experiencing this difficulty, do not fear; we have powerful solutions to address it immediately.
Why is Mac Asking to Grant Access
Why is this happening? The "Grant File Access" problem is frequently caused by macOS's privacy and security settings, which limit apps' access to certain files and folders. It may also occur if the file permissions are wrongly configured (such as the error message "You don't have permission to save files to this location"), there is an issue with Word's cache, or the program is outdated.
Mac devices secure user data with built-in security and privacy. These include requiring apps to seek permission to access files and directories. When Word for Mac displays the "Grant File Access" popup, it attempts to access a file when permission is denied on your Mac. Word often encounters this while opening, saving, or editing files in restricted folders.
Unset file permissions might also cause Word to fail to read or write the file. MacOS upgrades, security settings, Word cache, or version difficulties may also cause it. Ensure Word has permissions and is updated to avoid this question. Addressing these criteria will fix the "Grant File Access" problem and allow you to work on your projects uninterrupted.
How to Fix Grant File Access in Word for Mac in 4 Ways
Try these "Grant File Access" fixes. Each fix addresses a particular cause, and you may follow the comprehensive steps to resolve it:
- # 1. Check File Permissions
- # 2. Update Word App
- # 3. Remove Cache Folder
- # 4. Boot into macOS Safe Mode
Fix 1. Check File Permissions
Word for Mac "Grant File Access" issues might be caused by wrong file permissions. Making sure Word has the right rights to access files is easy. You must check and change the file or folder permissions to access it.
Step 1. Choose the Word document, double-click on it, and select "Get Info".
Step 2. Scroll down to "Sharing & Permissions" under Info. You should enter your Mac password behind the lock symbol at the bottom.
Step 3. Check your user account for "Read & Write" authorization. Change the option by selecting your user and selecting "Read & Write" from the selection.

Step 4. Select "Apply to enclosed items" from the gear icon to apply permissions across the folder.
Adjusting permissions lets Word access files without giving access questions. If you think this post helps, share it with your friends on SNS to help more people solve the "Grant File Access" issue in Word for Mac.
Fix 2. Update Word App
Outdated Microsoft Word is another cause of the "Grant File Access" question. To prevent bugs and compatibility difficulties, keep your Word program updated. Start Microsoft Word on your Mac, and select "Check for Updates" from the top "Help" menu.

Alternatively, open Microsoft AutoUpdate. Click "Check for Updates > Update" to download and install the new version. Restart Word after updating to determine whether the problem remains. Updated Word features and fixes may help cure the "Grant File Access" problem, particularly if a software malfunction or incompatibility causes it.
Fix 3. Remove Cache Folder
Word for Mac may constantly show the "Grant File Access" question due to corrupted cache files. Clearing the cache folder resets troublesome temporary files.
Step 1. Launch Finder and press "Command + Shift + G" to launch "Go to Folder".

Step 2. Enter ~/Library/Containers/com.microsoft.Word/Data/Library/Caches. Select all files and folders in the cache folder.
Step 3. Move chosen files to the Mac Trash bin folder. Restart your Mac and open Microsoft Word to confirm the fix.
Removing the cache files causes Word to reconstruct them, removing any damaged data. Fixing caching-related "Grant File Access" issues is straightforward and effective.
Is It Safe to Delete Cache Files on Mac [macOS Tips]
Is the cache folder taking up too much space on your MacBook? Then follow this easy guide on how to get rid of the cache folder and find out if it is safe to delete cache files on Mac. Read more >>
Fix 4. Boot into macOS Safe Mode
Booting into Safe Mode may fix third-party software and background process difficulties. Allowing just needed applications to run helps you find the "Grant File Access" bug. Check out the following steps:
Step 1. Turn off your Mac. Start it and hold "Shift" until the login screen appears.
Step 2. Release "Shift" when the Apple logo displays. Now in Safe Mode.
Step 3. Try opening the file in Microsoft Word Safe Mode. Restart your Mac to leave Safe Mode, then fix any Word-interfering third-party applications.
Booting into Safe Mode might help you identify external causes. If Word works in Safe Mode, you may need to resolve Mac application or service issues.
Extra Tip: Recover Unsaved Word Documents on Mac
Losing a Word document due to sudden shutdowns, program failures, or forgetting to save may be upsetting. Mac users may recover unsaved or lost Word files using EaseUS Data Recovery Wizard for Mac. Designed to restore deleted data, including Word documents, this program may retrieve them without saving them.
If your Word document was missing or unsaved due to unintentional deletion, power outages, or system failures, this program examines your Mac to find and restore it. Its simple UI and powerful recovery tools enable you to restore unsaved or deleted Word files in a few clicks. Here are the steps:
Step 1. Select the disk
Launch EaseUS Data Recovery Wizard for Mac, hover the mouse over the device where you lost an unsaved file, and click "Search for lost files".

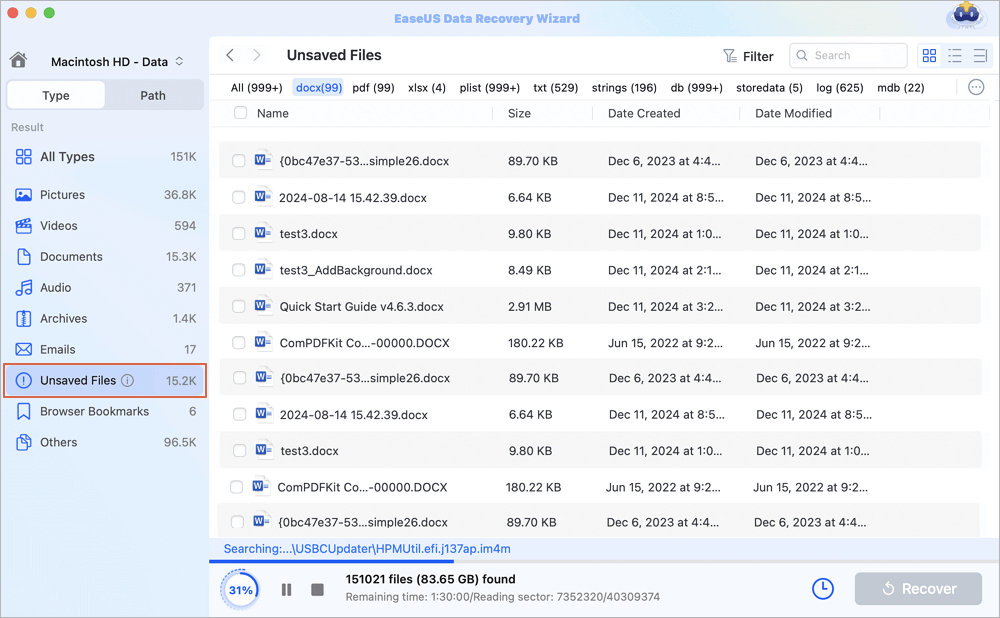
Step 2. Choose unsaved documents
After the scan, click "Type", and expand "Unsaved Documents". Click the exact file type - Word, Excel, Powerpoint, Keynote, Pages, or Numbers you lost without saving.

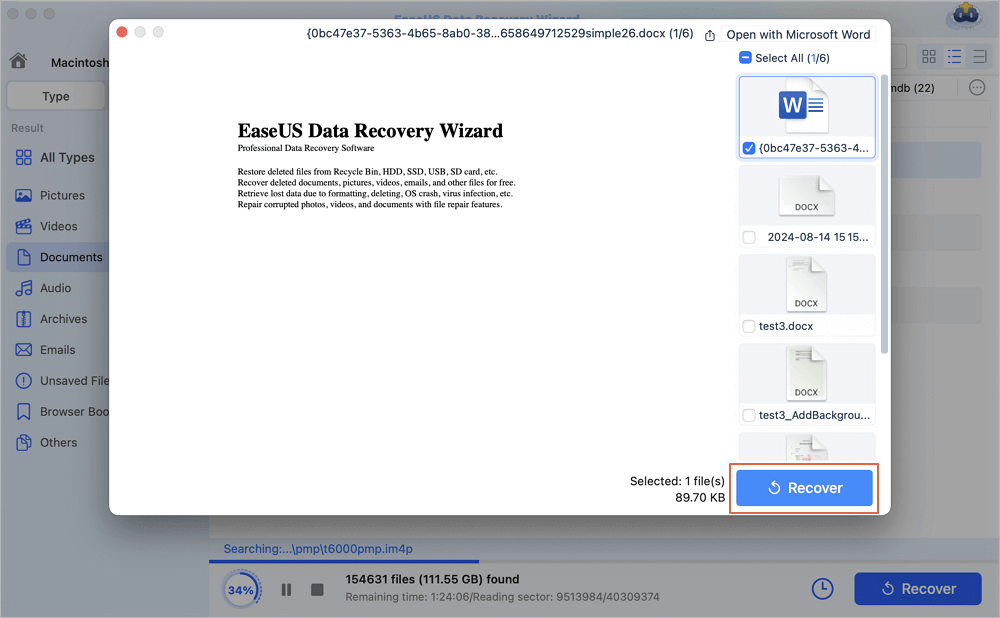
Step 3. Preview and recover unsaved files
Double-click to preview your unsaved file, select the right version and click "Recover" to save the file to another secure location on Mac.

Features of EaseUS Data Recovery Wizard for Word Document Recovery:
- After Word fails, EaseUS can recover unsaved Word document files without advanced backup
- Preview recovered Word files before restoring them to ensure the version or file you require.
- It supports recovering the accidentally saved Word document on a Mac.
Conclusion
Granting file access in Word for Mac might be difficult, but this article has easy solutions. Checking file permissions, upgrading Word, emptying the cache, and booting into Safe Mode are all straightforward ways to resolve the "Grant File Access in Word for Mac" issue.
If you lose or mistakenly erase a critical Word document, EaseUS Data Recovery Wizard can assist you. Its strong and simple features make restoring unsaved or lost data straightforward and fast. We suggest installing EaseUS Data Recovery Wizard to protect your crucial files no matter what. This reliable method protects your data even when difficulties happen.
Grant File Access in Word on Mac FAQs
Read the commonly searched FAQs to resolve your issues related to fixing grant file access for Mac:
1. How to fix grant file access on Word Mac?
The "Grant File Access" problem on Word for Mac may be fixed by verifying and modifying file permissions, upgrading Word, deleting the cache folder, or booting into Safe Mode. These methods guarantee Word can access files without extra permissions.
2. How do I grant access to a Word document?
To provide access to a Mac Word document, right-click it, pick "Get Info," and make sure your account has read and write rights. You may also click "Grant Access" and go to the file location to confirm.
Was This Page Helpful?
Brithny is a technology enthusiast, aiming to make readers' tech lives easy and enjoyable. She loves exploring new technologies and writing technical how-to tips. In her spare time, she loves sharing things about her game experience on Facebook or Twitter.
-
EaseUS Data Recovery Wizard is a powerful system recovery software, designed to enable you to recover files you’ve deleted accidentally, potentially lost to malware or an entire hard drive partition.
Read More -
EaseUS Data Recovery Wizard is the best we have seen. It's far from perfect, partly because today's advanced disk technology makes data-recovery more difficult than it was with the simpler technology of the past.
Read More -
EaseUS Data Recovery Wizard Pro has a reputation as one of the best data recovery software programs on the market. It comes with a selection of advanced features, including partition recovery, formatted drive restoration, and corrupted file repair.
Read More
Related Articles
-
Sharing Name and Photo Not Available, Why and How to Fix It
![author icon]() Brithny/Nov 27, 2024
Brithny/Nov 27, 2024 -
How to Fix Can't Open RAR as Archive on Mac [Step-by-Step Tutorial]
![author icon]() Brithny/Jan 21, 2025
Brithny/Jan 21, 2025 -
How Do I Clone Mac OS X 10.7 Lion to Another Drive - Full Guide
![author icon]() Cici/Feb 05, 2025
Cici/Feb 05, 2025 -
Word Can't Open the Document: User Does not Have Access Privileges Mac
![author icon]() Brithny/Nov 27, 2024
Brithny/Nov 27, 2024
