


Start Your Free Trial!
Sign up to our newsletter, stay updated on news and exclusive offers from EaseUS. Don't worry, if you change your mind, you can unsubscribe at any time, free of charge. We value your privacy (Privacy Policy).
EaseUS Partition Master
Have you ever found yourself with a brand-new USB drive that your macOS just won't recognize? Check here. We will show you how to format USB to solve this problem.

Content
Page Table of Contents
How to Format USB Flash Drive on Mac - 3 WaysHOT
Format USB to exFAT or FAT32 on Mac! Why?HOT
ConclusionHOT
FAQs About How to Format USB Flash Drive on MacHOT
About the Author
Hot Topics
Have you ever found yourself with a brand-new USB drive that your macOS just won't recognize? This situation usually occurs because Mac and Windows use different file systems. Most device manufacturers still manufacture products with Windows as the center. Therefore, knowing how to format a USB flash drive on a Mac can help solve this problem. At the same time, it can also reduce the possibility of accidental damage, data loss, or other performance issues.
In this post, you will learn how to format your new USB flash drive on Mac using three effective methods. All solutions provide detailed, illustrated guides to assist you in formatting your drive so that you can take full advantage of your new USB without the inconvenience. EaseUS will guide you through the process of formatting USB on Mac safely and effectively.
FAT32 and exFAT are compatible with Windows and macOS. It will be very convenient to share files if you set the USB file system format to FAT32 or exFAT. For Apple Mac users, there are three ways to format a USB flash drive on Mac: using EaseUS Partition Master for Mac, Disk Utility, and the Terminal command line. Here are the detailed steps for USB formatting using these three methods.
Formatting USB with EaseUS Partition Master for Mac will erase all data on the flash drive. So before performing this operation, always remember to check whether you have saved useful data to another secure device in advance.
To format the USB drive, follow the next steps:
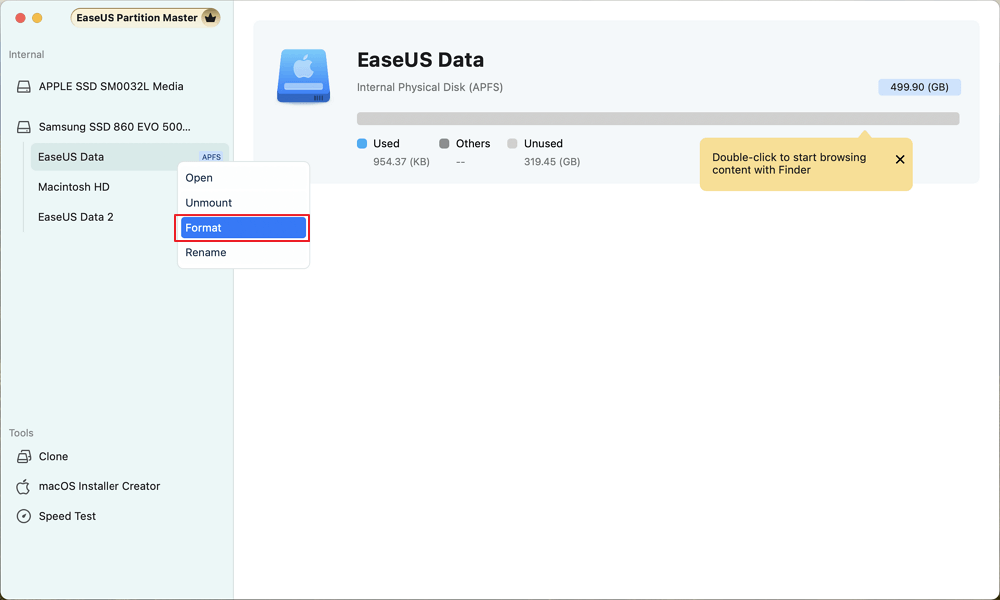
Step 1. Run EaseUS Partition Master for Mac, right-click on a target disk drive and select "Format".
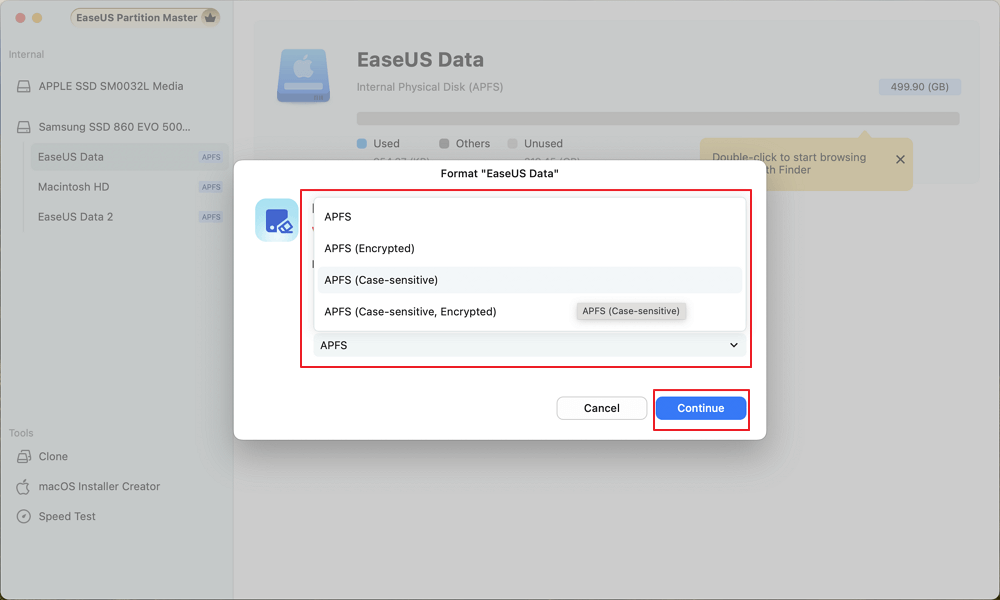
Step 2. Rename the volume, select a new format to the target volume and click "Continue" to confirm.
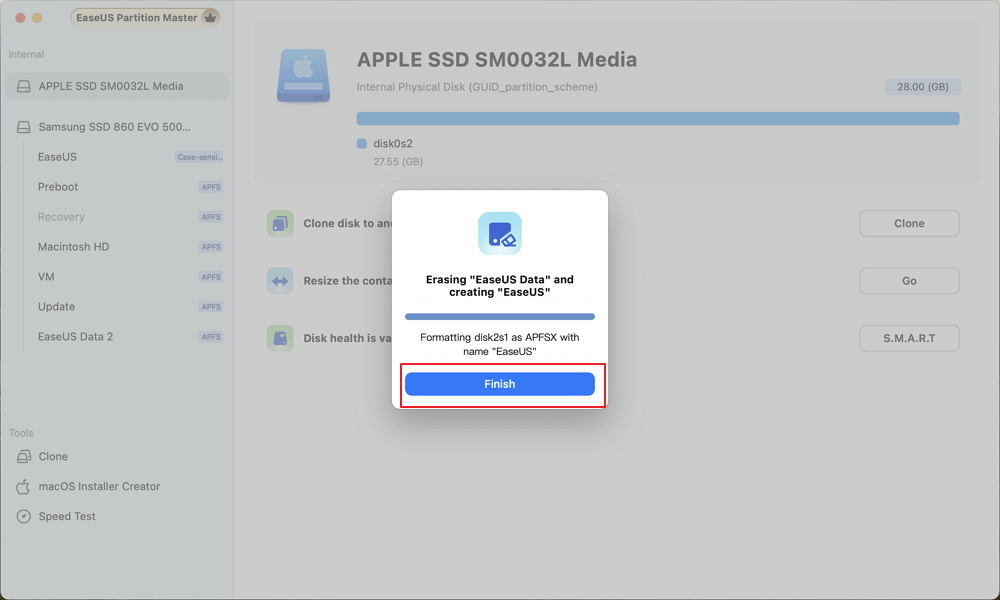
Step 3. Let the program to format the selected disk volume and click "Finish" when the formatting process completes.
With the above steps, you can format the USB easily. In addition, EaseUS Partition Master for Mac offers a variety of other valuable features that enhance your experience.
Try EaseUS Partition Master for Mac to format your new USB flash drive quickly and efficiently.
It's an efficient way to format a USB by using Disk Utility on your Mac. This application, which has a built-in Mac, provides a user-friendly interface for managing disks and drives, making it easy to prepare a USB drive for use with macOS or other operating systems. Here are the steps to format a USB flash drive using Disk Utility.
Step 1. Insert the USB flash drive into your Mac.
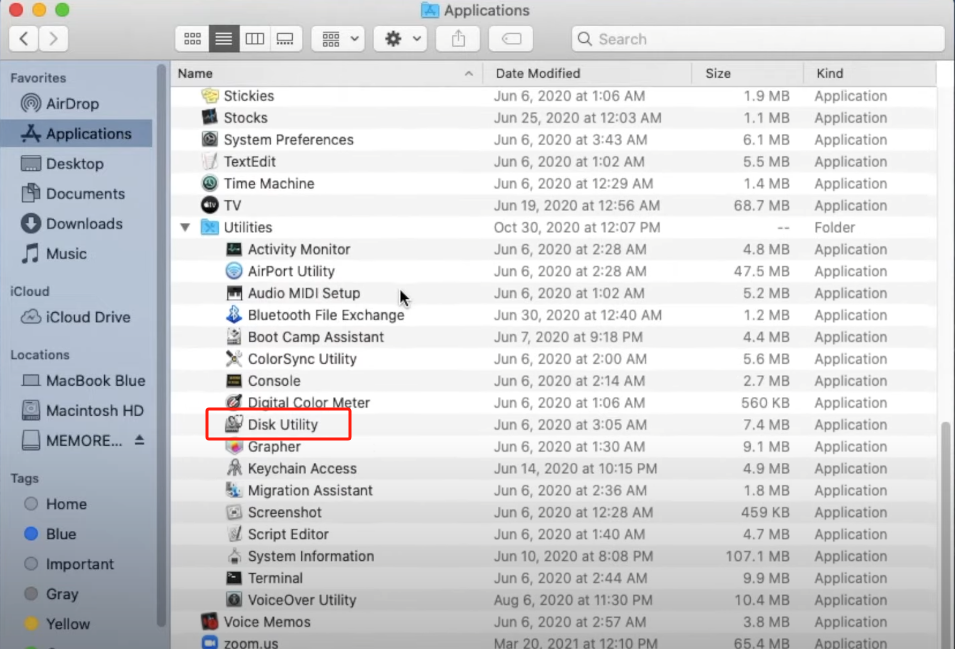
Step 2. In the Finder on your Mac, choose "Applications" > "Utilities," then double-click the "Disk Utility" icon.
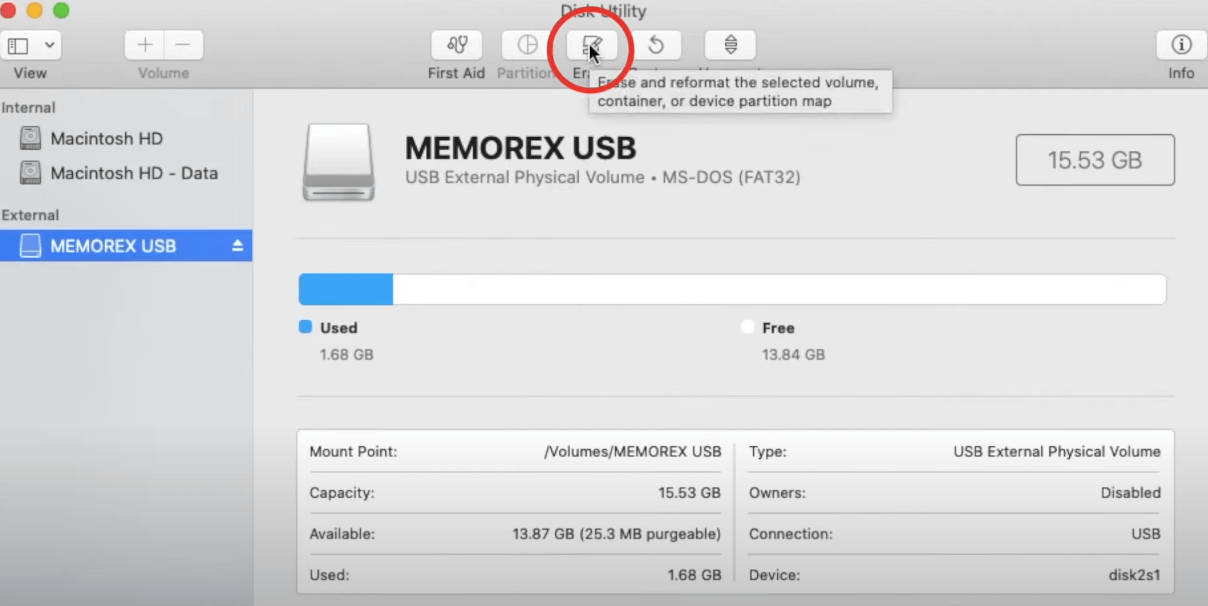
Step 3. Find and select your USB drive in the Disk Utility's sidebar.
Step 4. Click the erase button at the top of the window to erase the USB.
Step 5. Name your new drive in the dialog box that pops up. Then select the format you need from the drop-down menu.
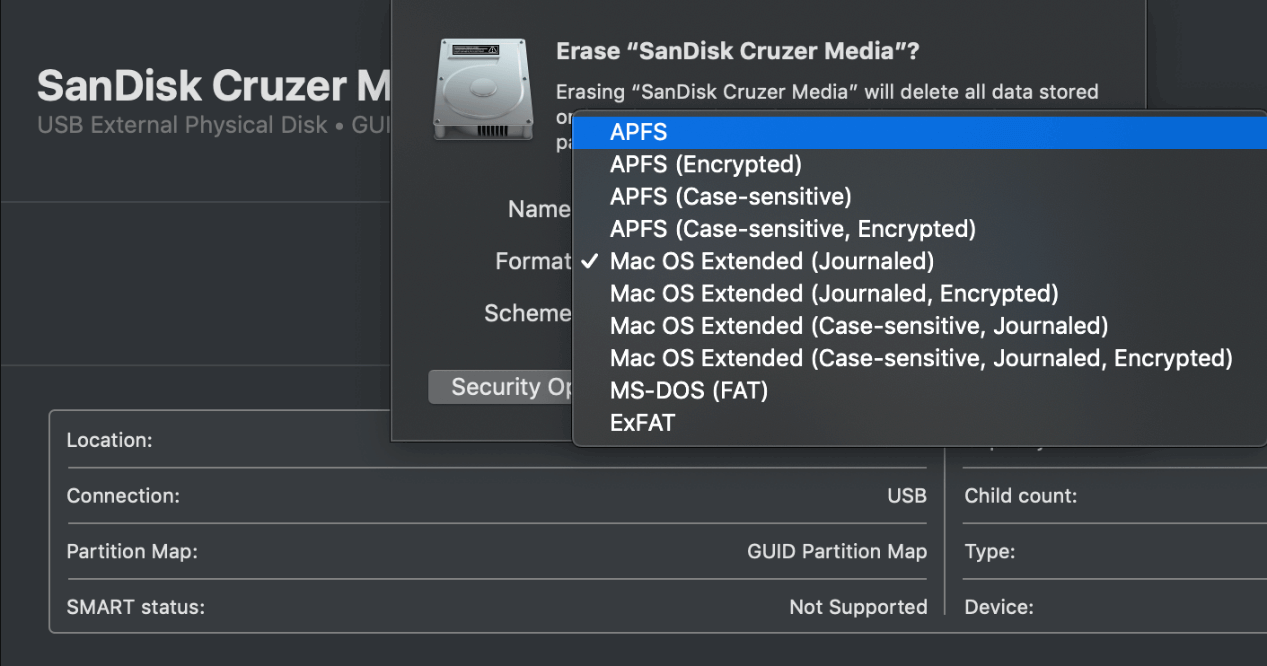
Step 6. Click the Erase button to begin formatting. This will delete all data on the drive.
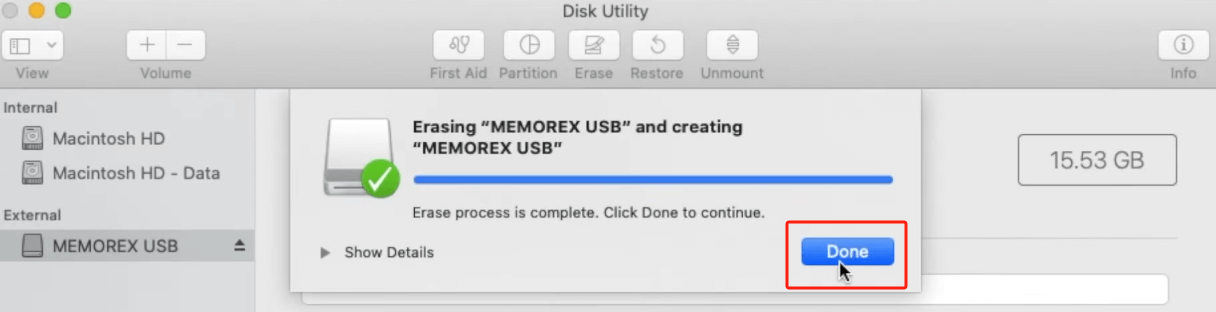
Then you will get a new USB flash drive, which you can use to store data on your Mac.
Share this post with more Mac users by clicking the following buttons.
Using the command line to format a USB flash drive on a Mac is a good option for users familiar with Terminal commands. You can precisely control over the formatting process. Here is a step-by-step guide on using command line on Mac.:
Step 1. Connect your USB by inserting it into an available USB port on your Mac.
Step 2. Press Command (⌘) + Spacebar to open Spotlight, type Terminal, and press Enter to launch the Terminal application.

Step 3. Type the following command and press Enter in the Terminal window: diskutil list
(Your USB is usually labeled as /dev/diskX, where X is a number, commonly /dev/disk2). This command will display a list of all connected drives. Identify your USB drive in the list.
Step 4. Select the command based on your preferred format, copy and paste it, and then press Enter.
For example, formatting a USB drive to FAT32 using the Terminal command line on a Mac:
 it
it
After executing the format command, wait for the process to finish. Once it is complete, you can enter the command diskutil list again to verify whether the formatting was successful.
When formatting a USB, it's important to understand the different formatting options available for your ideal use. Here's a comparison of the most common file system formats supported by macOS for USB:
| File System | Applicable to | Limitation |
|---|---|---|
| 💻APFS | MacOS 10.13 or later | Cannot be installed on Windows computers |
| 🌟Mac OS Extended | MacOS 10.12 or earlier | Cannot be installed on Windows computers |
| 🏅MS-DOS (FAT) | Cross-system, e.g., Windows and Mac | Single file size is limited to 4GB |
| 🏅ExFAT | Cross-system, e.g., Windows and Mac | Cannot work with File History and Time Machine |
Users can choose different file system formats according to their needs. If you often share files between Windows and macOS systems, it is recommended to set the USB file system format to exFAT or FAT32.
Now, you can choose a suitable file system format as needed. Share this tutorial to help more of your friends:
In conclusion, there are three proven methods to help you format USB. When you manage USB on Mac, EaseUS Partition Master for Mac is highly recommended for its user-friendly interface and comprehensive features. It can simplifies the process of formatting and save your time and energy.
Whether a beginner or a seasoned professional, EaseUS Partition Master for Mac provides a reliable solution for all your disk management needs, enhancing your overall Mac experience.
To extend your knowledge about how to format a USB flash drive on Mac, we prepared some frequently asked questions to help you:
1. Why should I format the USB with Windows and macOS?
It's best to format your USB drive as exFAT for cross-platform compatibility between Windows and macOS. exFAT is compatible with various operating systems, enabling users to easily share data between Windows PCs, Mac computers, and even Linux systems without reformatting.
2. Can Mac format FAT32?
Yes. You can format drives as FAT32 in Disk Utility. Also, you can use Mac Command Line to format FAT32. If you want to know more details, you can refer to this blog: How to Format SD Card to FAT32 on Mac | 3 Ways.
3. Will formatting erase all data on my USB drive?
Yes. Formatting the drive permanently removes all data from the drive. So make sure to back up important files before formatting a USB drive to prevent data loss.
How Can We Help You
Cici is the junior editor of the writing team of EaseUS. She accepted the systematic training on computers at EaseUS for over one year. Now, she wrote a lot of professional articles to help people resolve the issues of hard drive corruption, computer boot errors, and disk partition problems.
It won't hot image your drives or align them, but since it's coupled with a partition manager, it allows you do perform many tasks at once, instead of just cloning drives. You can move partitions around, resize them, defragment, and more, along with the other tools you'd expect from a cloning tool.
Read MoreI love that the changes you make with EaseUS Partition Master Free aren't immediately applied to the disks. It makes it way easier to play out what will happen after you've made all the changes. I also think the overall look and feel of EaseUS Partition Master Free makes whatever you're doing with your computer's partitions easy.
Read MorePartition Master Free can Resize, Move, Merge, Migrate, and Copy disks or partitions; convert to local, change label, defragment, check and explore partition; and much more. A premium upgrade adds free tech support and the ability to resize dynamic volumes.
Read MoreIt won't hot image your drives or align them, but since it's coupled with a partition manager, it allows you do perform many tasks at once, instead of just cloning drives. You can move partitions around, resize them, defragment, and more, along with the other tools you'd expect from a cloning tool.
Read MoreI love that the changes you make with EaseUS Partition Master Free aren't immediately applied to the disks. It makes it way easier to play out what will happen after you've made all the changes. I also think the overall look and feel of EaseUS Partition Master Free makes whatever you're doing with your computer's partitions easy.
Read MoreRelated Articles
3 Ways to Fix the Mac Mount Failed with 72 Error [Without Data Loss]
![]() Brithny/2024/12/23
Brithny/2024/12/23
How to Sync Apple Calendar with Google Calendar [Step-by-Step Tutorial]
![]() Brithny/2025/04/09
Brithny/2025/04/09
How to Clone Mac Hard Drive to USB Flash Drive – Full Guide
![]() Cici/2025/04/28
Cici/2025/04/28
What Is M1 Mac Recovery Mode and How to Use It
![]() Jaden/2025/04/01
Jaden/2025/04/01
EaseUS Partition Master

Manage partitions and optimize disks efficiently
Your best companion for disk partitioning, MBR to GPT/GPT to MBR conversion,even OS migration
Copyright © 2004 - 2025 EaseUS. All rights reserved.
CHOOSE YOUR REGION
Start Your Free Trial!
Sign up to our newsletter, stay updated on news and exclusive offers from EaseUS. Don't worry, if you change your mind, you can unsubscribe at any time, free of charge. We value your privacy (Privacy Policy).
Start Your Free Trial!
Sign up to our newsletter, stay updated on news and exclusive offers from EaseUS. Don't worry, if you change your mind, you can unsubscribe at any time, free of charge. We value your privacy (Privacy Policy).